
Default Apache Nifi installation comes without security layer which exposes the development UI. As a result, users can freely access the Nifi project development with knowledge about the hostname and binding Port. You can see two potential security risks:
- Flow controller attack : full policies to modify the processor on Flow Controller.
- API attack: external invoked requests to start/stop/delete Nifi components.
Implement strategy
To protect the unexpected security issues related, this post will help to list out steps by steps to setup security layer in the default Apache Nifi installation. The LDAP User Authentication method is used because of its easy to manage and setup while maintains secured manner. Details on can be found HERE from the official website.
There are three main components added to the previously diagram, including LDAP server, Authentication and Authentization:
- LDAP server: manage the users’ access to Nifi server. This server can be deployed within same or seperate server with Nifi. In this post, the OpenLDAP library is used as its popularity.
- Authentication: enable authentication feature to perform a handshake with LDAP server to recognize who is logging on the server.
- Authorization: distinguish the which policies are applied for current login account.
To enable these 3 components, it required to setup an additional LDAP server apart from Nifi service; and perform configuration for number of config files such as nifi.properties, login-identity-providers.xml, authorizers.xml, etc. The next 3 sections will describe the implementation details for these 3 componenents.

LDAP Server
Simply run an OpenLDAP docker as below:
1 | docker run --name vanducng-openldap --env LDAP_ORGANISATION="myorg" --env LDAP_DOMAIN="vanducng.dev" --env |
We target run on domain vanducng.dev with initial admin password of “SuperSecret” which later on can be change via ADS. Further configurations can be found from here.
Authentication
Then LDAP server is now accessible using docker machine IP. It can be checked by iptables -L command:
However, to enable a handshake with LDAP server, Nifi has to be configured to enable HTTPS/SSL first as stated in the official document.
Use toolkit to generate config files
Start following commands to download the nifi toolkit to generate the List of configuration files are shown as below including keystore.jks, nifi-cert.pem, nifi-key.key, nifi.properties, truststore.jks.
1 | wget http://www-eu.apache.org/dist/nifi/1.10.0/nifi-toolkit-1.10.0-bin.tar.gz |
Move these files to conf folder under nifi location:
1 | mv vanducng.dev/* /nifi/conf/ |
Edit nifi.properties
Open the file with preferred text editor:
1 | nano /nifi/conf/nifi.properties |
In web properties section, apply the https hostname and specific port as following. The hostname must be same as domain name for public access, else the webserver will return a header error. In this example, I was using Amazon EC2 as remote server.
1 | # web properties # |
Ensure the ldap-provider is configured in nifi.security.user.login.identity.provider as well.
1 | # security properties # |
Map hostname with private IP address
Open hosts file:
1 | nano /etc/hosts |
Map the private IP address of the EC2 instance with the hostname defined in nifi.properties config file.
1 | 172.31.23.12 ec2-xxx-xxx-xxx-xxx.ap-southeast-1.compute.amazonaws.com |
Edit login-identity-providers.xml
Similar to nifi.properties, open login-identity-providers.xml with preferred text editor, then uncomment ldap-provider xml block and configure the LDAP information that has been setup in previous step.
1 | <provider> |
After finish this step, restart Nifi to apply the new configuration.
1 | /nifi/bin/nifi.sh restart |
Under the hood, Jetty server started apply the additional security settings and host the web via defined domain name. It can be check by parsing the nifi-app.log as below.
1 | cat tail /nifi/logs/nifi-app.log |
Authorization
With authentication setup, initial admin user from LDAP server that has been defined in authentication step can login to the Nifi webserver, no tasks can be performed because of no policies applied as below image:
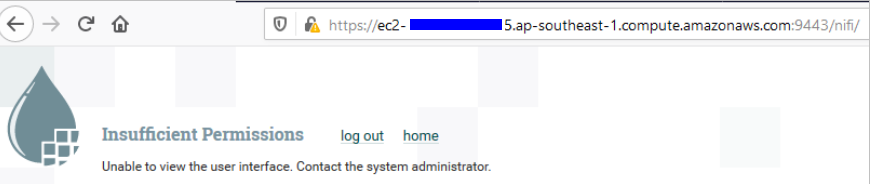
To get into development stage and assign policies for new users, it required to setup initial admin identity and logged-in admin to perform policies assignment since then.
Setup initial admin identity
To pass authorities for admin user, edit the authorizer.xml in config folder by enabling authorizer with file-provider as below.
1 | <authorizer> |
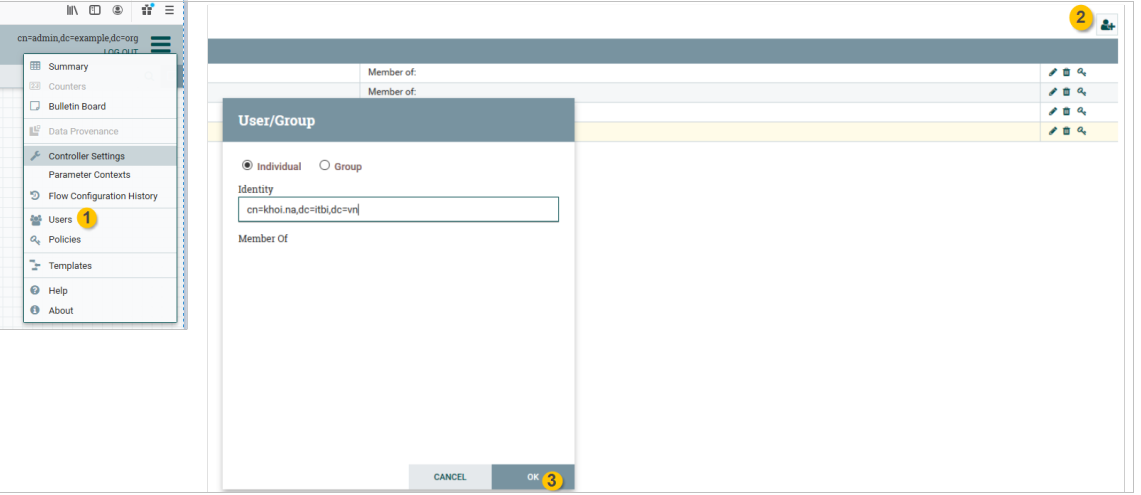
Assign policies for registered users
Restart Nifi service, them admin user has full access and able to assign policies for LDAP user.
References
- https://nifi.apache.org/docs/nifi-docs/html/administration-guide.html
- https://nifi.apache.org/docs/nifi-docs/rest-api/index.html
- https://docs.oracle.com/cd/B10501_01/network.920/a96579/comtools.htm
- https://mintopsblog.com/2017/11/01/apache-nifi-configuration/
- http://ijokarumawak.github.io/nifi/2016/11/15/nifi-auth
Comments