
This post provides a general setup to start with Spark development on local computer. This is helpful for getting started, experimenting the Spark functionalities or even run a small project.
Prepare development environment
Install WSL (for Windows only)
Note that installing WSL requires admin right. If you are using Windows Builds 18917 or higher, please use WSL2 for more features and performance boosted.
Download Ubuntu 18.04 from https://aka.ms/wsl-ubuntu-1804
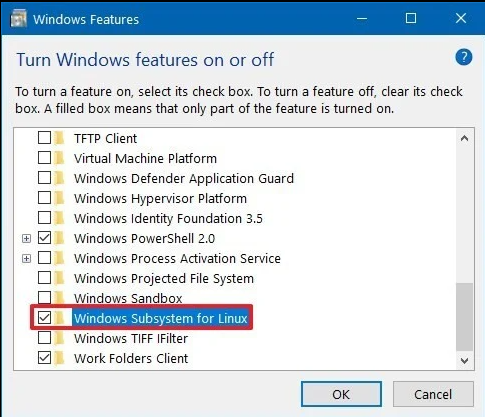
Enable Windows Subsystem for Linux on Windows Futures as below. (search Turn Windows features on or off to open this window)
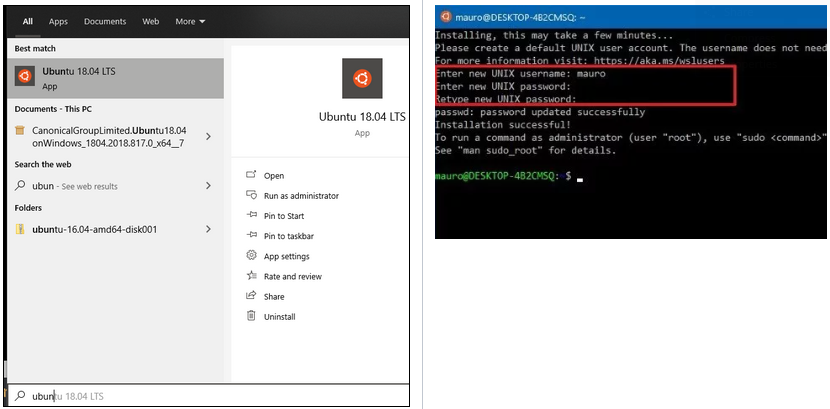
Launch Ubuntu via Search bar and configure the username and password at the first time.
Install prerequisites
Java
Install Java 1.8
1
2
3
4
5
sudo apt update
sudo apt -y upgrade
sudo add-apt-repository ppa:webupd8team/java
sudo apt update
sudo apt install oracle-java8-installer oracle-java8-set-defaultCheck the version
1
java -version
Python
- The default python version is 3.6 if using Ubuntu 18.04 LTS, just perform upgrade python3 & install pip3:
1
2
3
4
5
6
sudo apt upgrade python3
sudo apt install python3-pip
# Default located at /usr/bin/python3
# Check by issue below command
which python3
Note: recommend later to use anaconda package from https://www.anaconda.com/products/individual which comes with most of needed dependencies for data science project.
- The default python version is 3.6 if using Ubuntu 18.04 LTS, just perform upgrade python3 & install pip3:
Apache Spark
Download and extract to
/opt/spark:1
2
3
4
5cd ~
curl -O https://archive.apache.org/dist/spark/spark-2.4.5/spark-2.4.5-bin-hadoop2.7.tgz
tar xvf spark-2.4.5-bin-hadoop2.7.tgz
sudo mv spark-2.4.5-bin-hadoop2.7/ /opt/spark
rm -rf spark-2.4.5-bin-hadoop2.7.tgzSetup Spark environment:
1
2
3
4
5echo 'export SPARK_HOME=/opt/spark' >> ~/.bashrc
echo 'export PATH=$PATH:$SPARK_HOME/bin:$SPARK_HOME/sbin' >> ~/.bashrc
echo 'export PYSPARK_PYTHON=/usr/bin/python3' >> ~/.bashrc
echo 'export PYTHONPATH=$SPARK_HOME/python:$SPARK_HOME/python/lib/py4j-0.10.7-src.zip:$PYTHONPATH' >> ~/.bashrc
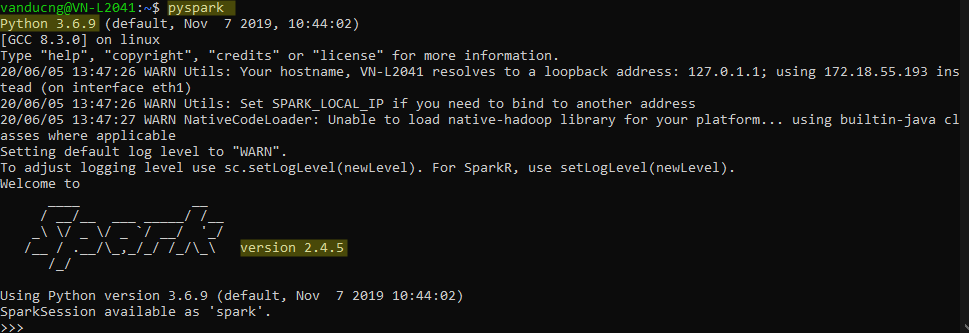
source ~/.bashrcCheck the pyspark on shell:
1
pyspark
The result should be looked as below:
Run Spark application
There are 3 basic running modes of a Spark application:
- Local: all processes are executed inside a single JVM which is suitable for quickly examine Spark API, functions, etc. You can use pyspark shell or specify master to local, local[*] or local[n] in SparkSession.
- Standalone: can run on a single or multiple machines with 1 master and multiple slaves. With this mode, you still achieve distributed features within Spark but not reliable enough for a serious production need. Standalone mode is good for application development where we can see how Spark functions before deploying to a cluster managed by Yarn, MESOS or Kunernetes.
- Cluster: could be used with Yarn, MESOS or Kunernetes. It’s worth noting that there are two different deployment modes client (master/driver runs on development environment or your laptop) & cluster (master/driver runs on cluster, once submitted, you can close laptop and take coffee) as described below.

Run Spark local mode on shell
Use below code on pyspark shell. In this scenario, there is no need to initiate SparkSession as it is attached to spark variable by default (look below code, no spark variable assignment needed).
This is a simple application create 2 data frames with some transformations (multiply with 5, join then sum). The collect() action will trigger Spark actually to proceed the calculation, the result is 2,500,000,000,000.
simple_app.py 1
2
3
4
5
6
7
8df1 = spark.range(2, 10000000, 2)
df2 = spark.range(2, 10000000, 4)
step1 = df1.repartition(5)
step12 = df2.repartition(6)
step2 = step1.selectExpr("id * 5 as id")
step3 = step2.join(step12, ["id"])
step4 = step3.selectExpr("sum(id)")
step4.collect() # 2500000000000Quickly run run your code with interactive pyspark from terminal:
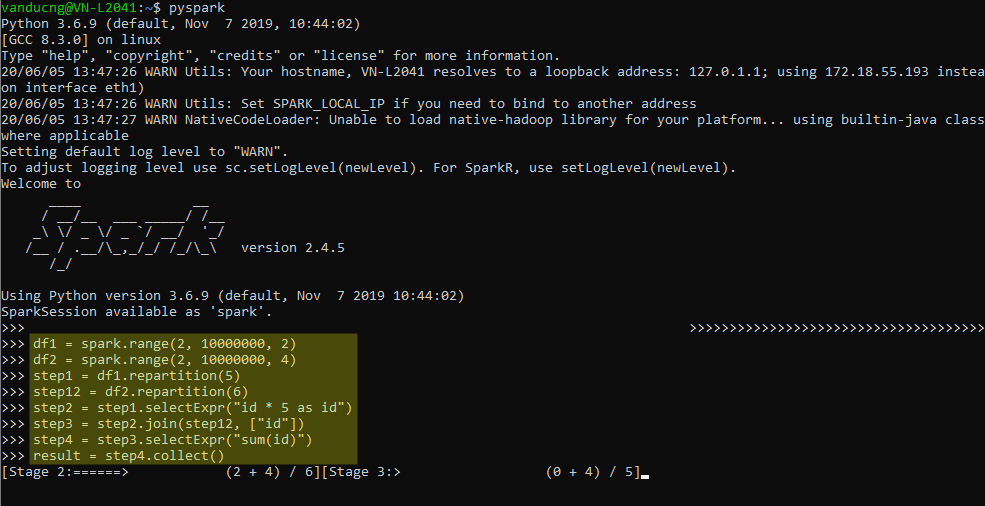
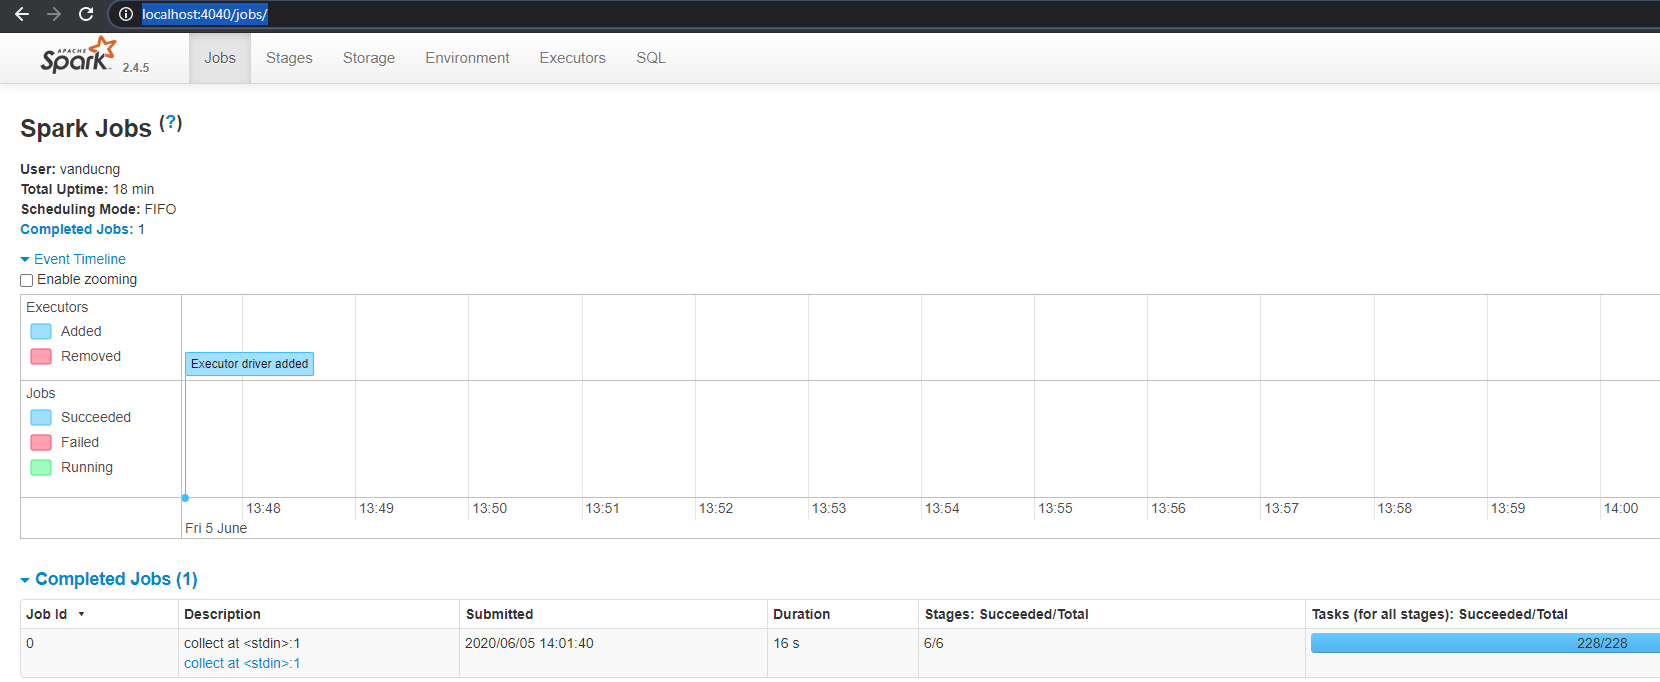
Access Spark UI from: http://localhost:4040/jobs/. From Spark UI, you can narrow down into Jobs, Stages, Tasks. More details about these term can be found from Spark hierarchy and Spark visualization.
Run Spark local mode on py script
The below code snippet is identical to previous one except the initiation for spark variable which requires to import pyspark library.
To run the script, simply call python3 to execute the script. Same result is expected as presented in previous method.
Eg.
spark-submit simple_app.pysimple_app.py 1
2
3
4
5
6
7
8
9
10
11
12
13
14
15
16
17
18
19from pyspark.sql import SparkSession
# local[*] means that all cores will be used to run the application
spark = SparkSession\
.builder\
.appName("SparkApp")\
.master("local[*]")\
.getOrCreate()
df1 = spark.range(2, 10000000, 2)
df2 = spark.range(2, 10000000, 4)
step1 = df1.repartition(5)
step12 = df2.repartition(6)
step2 = step1.selectExpr("id * 5 as id")
step3 = step2.join(step12, ["id"])
step4 = step3.selectExpr("sum(id)")
result = step4.collect()
print(result) # 2500000000000
Run Spark on standalone mode
Prepare py script: simple app update by removing master so it can catch out specific master to standalone master URL.
simple_app.py 1
2
3
4
5
6
7
8
9
10
11
12
13
14
15
16
17
18from pyspark.sql import SparkSession
# local[*] means that all cores will be used to run the application
spark = SparkSession\
.builder\
.appName("SparkApp")\
.getOrCreate()
df1 = spark.range(2, 10000000, 2)
df2 = spark.range(2, 10000000, 4)
step1 = df1.repartition(5)
step12 = df2.repartition(6)
step2 = step1.selectExpr("id * 5 as id")
step3 = step2.join(step12, ["id"])
step4 = step3.selectExpr("sum(id)")
result = step4.collect()
print(result) # 2500000000000Enable history log: examine the Spark application as in SparkUI after jobs finished. Used this feature to deep dive into understanding Spark operation. You still see it while Spark is running, but all gone after completed.
If /tmp/spark-events is not available, create it.
Next, it requires to enable spark.eventLog.enabled to True by editing /opt/spark/conf/spark-defaults.conf (copy the template if it doesn’t exist yet), and uncommenting/adding the line:
1
2
3
4
5
6# spark.master spark://master:7077
spark.eventLog.enabled true
# spark.eventLog.dir hdfs://namenode:8021/directory
# spark.serializer org.apache.spark.serializer.KryoSerializer
# spark.driver.memory 5g
# spark.executor.extraJavaOptions -XX:+PrintGCDetails -Dkey=value -Dnumbers="one two three"Access the history server UI, typically from http://localhost:18080 after running below command:
1
2# This script is located at SPARK_HOME/sbin/
start-history-server.sh
Start master server:
Start master by running below command:
1
2# This script is located at SPARK_HOME/sbin/
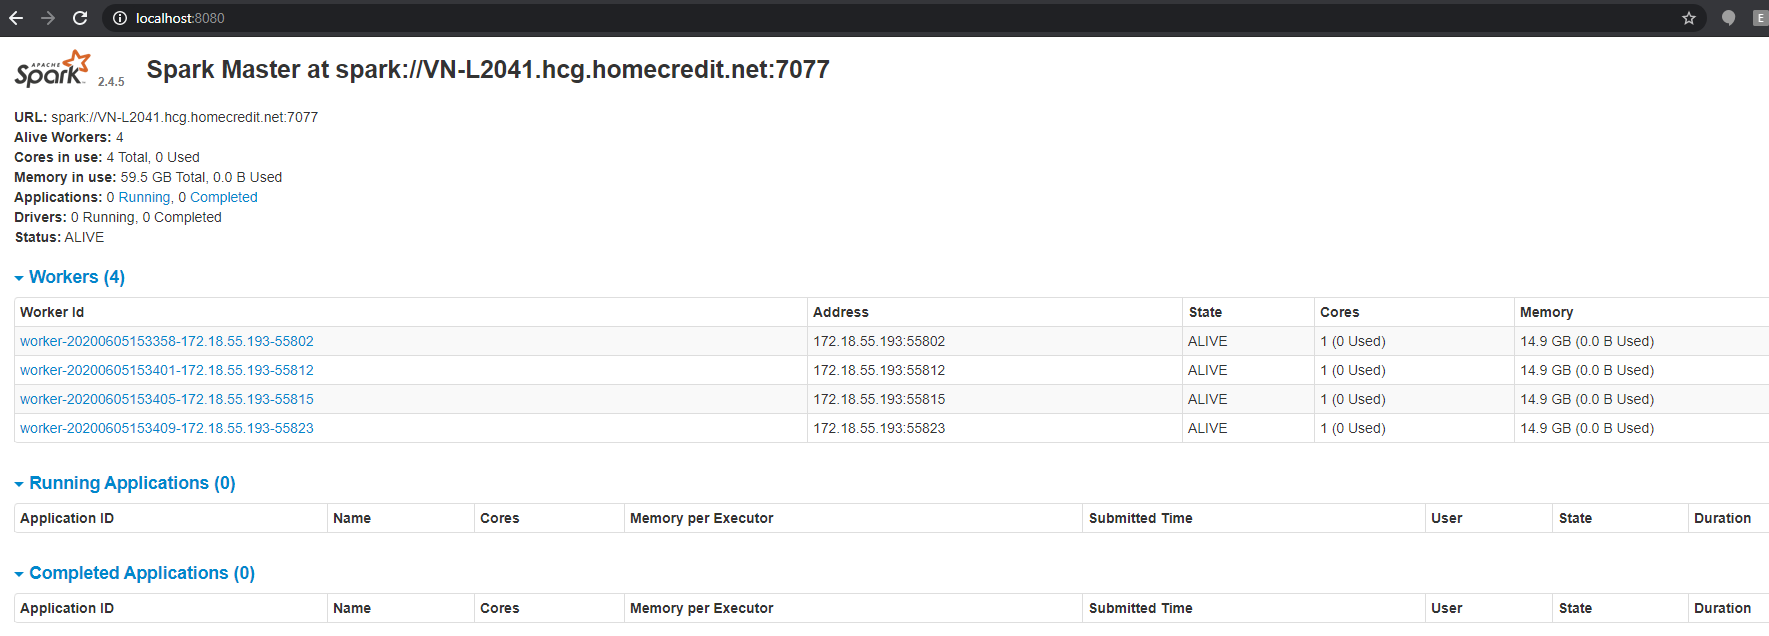
start-master.shOnce started, the Spark master process can be accessed from http://localhost:8080/. Note the spark master URL based on return value (it may different from yours), as it running my laptop, its URL is spark://VN-L2041.hcg.homecredit.net:7077
If your environment is Windows, it can be achieved with below commands.
1
2
3
4
5
6
# Start master
spark-class org.apache.spark.deploy.master.Master
# Start slave
# Repeat starting slave command on other cmd/powershell windows to increase number of workers
spark-class org.apache.spark.deploy.worker.Worker spark://172.18.55.193:7077 --cores 1 --memory 1gSubmit spark job:
- This step to examine your code to see how it functions on a cluster manner. Any optimization steps can be observed during this development phase via Spark visualization and logging tool.
- Run spark-submit with preferred parameters as below, expected result is [Row(sum(id)=2500000000000)] printed out to the terminal.
1
spark-submit master spark://VN-L2041.hcg.homecredit.net:7077 simple_app.py

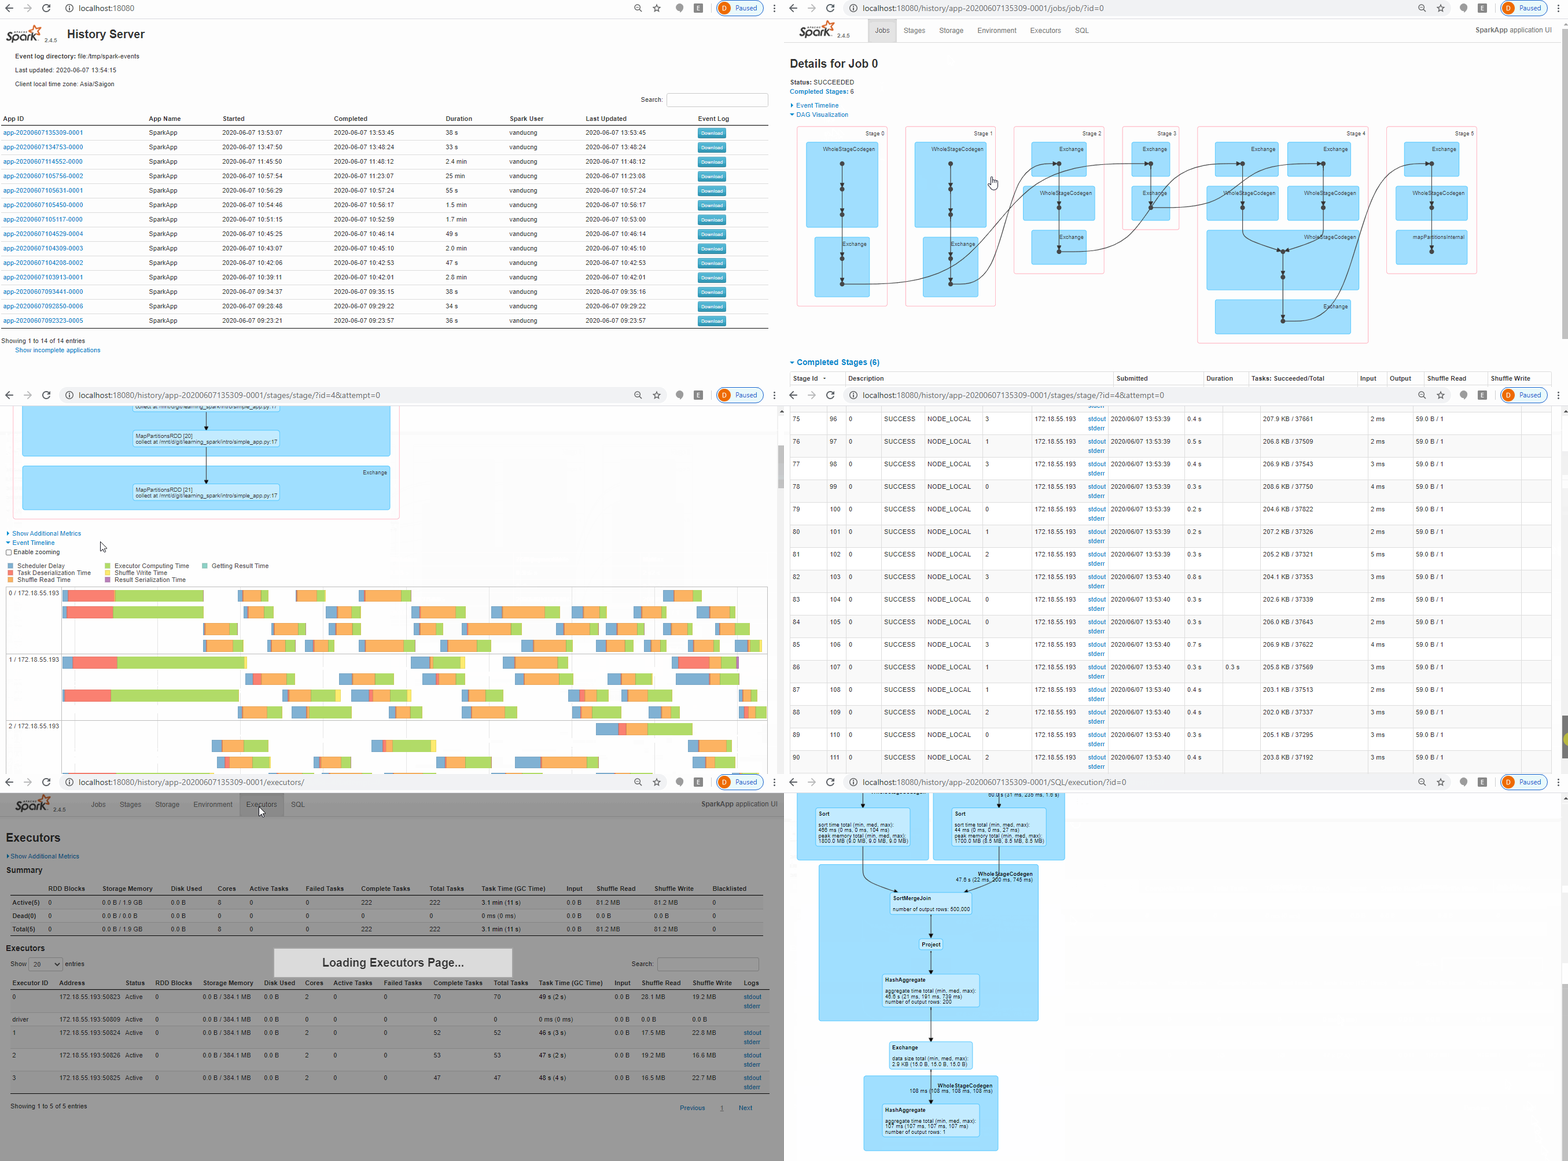
- You can either access from master (http://localhost:8080/) during job running or history server (http://localhost:18080/) once job done. Below screen shot show how you can examine Spark operation on history server based event logs.
Stop master, slave & history-server: simply run below commands:
1
2
3stop-slave.sh
stop-master.sh
stop-history-server.sh
Run Spark on cluster mode
Besides built-in cluster manager called the Standalone cluster manager, Spark also works with Hadoop YARN, Apache Mesos or Kubernetes cluster managers. This is not part local development as it requires more resources. This is where we take the real Spark power for the purpose of preprod or prod deployment.
Example of spark-submit command in cluster mode with YARN:
1 | spark-submit --master yarn --deploy-mode client simple_app.py |
References
- http://blog.miz.space/tutorial/2016/08/30/how-to-integrate-spark-intellij-idea-and-scala-install-setup-ubuntu-windows-mac/
- https://docs.scala-lang.org/getting-started/intellij-track/building-a-scala-project-with-intellij-and-sbt.html
- https://medium.com/@raviranjan_iitd/running-a-scala-code-as-a-spark-submit-job-using-sbt-e03ba05b941f
- https://medium.com/@aamargajbhiye/apache-spark-setup-a-multi-node-standalone-cluster-on-windows-63d413296971
- https://www.sicara.ai/blog/2017-05-02-get-started-pyspark-jupyter-notebook-3-minutes
Comments